Classic arrow in permanent makeup: procedure algorithm
Arrow in permanent makeup: timeless classic
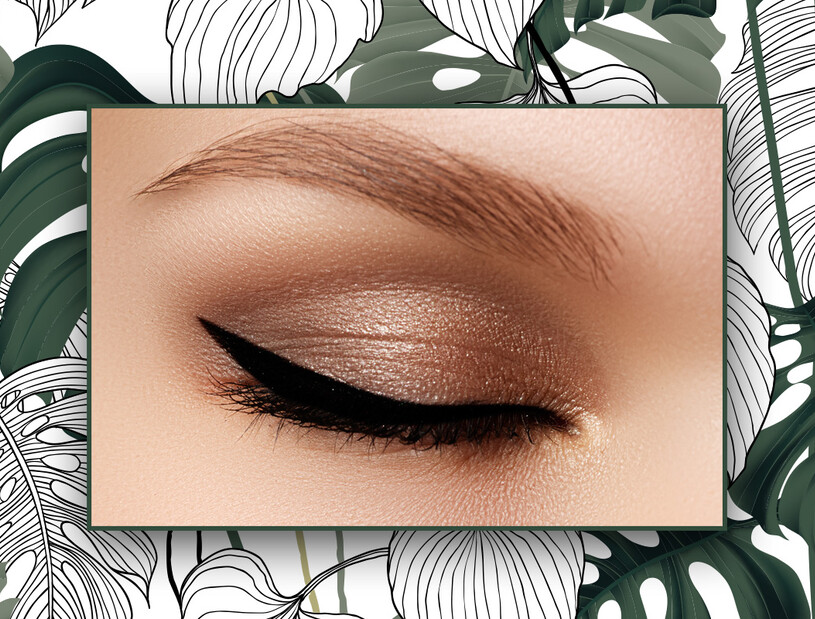
In the era of traditional tattooing, there were only two types of arrows: classic and interlash, today another type is performed: an arrow with shading. Consider the classic look of eye tattoo in its modern aspect.
classic arrow
Smooth, with a smooth transition from narrow to wider, the arrow suits absolutely any type of woman. The arrow emphasizes the shape of the eyes, focuses on the look and eyelashes and allows you to forget about daily makeup for a long time. In addition, the classic arrow helps to reliably hide some defects. For example, slightly correct the shape, lengthen it or make the eyes more round, hide shallow facial wrinkles or minor imperfections in the form of scars, pigmentation.
The shape of the arrow can be of any thickness and length. The arrow may end at the edge of the eye or exit with a tail with a different slope. The master chooses the shape of the arrow (preferably) based on the shape of the client's eyes and her wishes.
Procedure algorithm
Stage 1. We make a sketch with a black cosmetic pencil: first, draw a line that continues the upper eyelid, then draw a line along the contour of the upper eyelid to the middle of the eye. From the outer side of the arrow, draw a line along the crease of the upper eyelid. The resulting corner is completely painted over with a pencil. The arrow thickens towards its outer edge
Stage 2. Application of anesthesia
Anesthesia may be in the form of an ointment, gel, applicator or emulsion. When choosing anesthesia, make sure that the client does not have an allergy to any ingredient of the drug. Keep the anesthesia time for 10 - 15 minutes to avoid excessive swelling of the skin during the procedure.
Stage 3. Performing a Classic Arrow Draw
At a low speed, with a single-channel needle, we trace the outline of the sketch. We observe the angle of inclination of the handle 90 °. It is very important to work lightly, like a feather, smoothly entering the skin. To create the effect of a thinly outlined corner of the arrow, we continue to work with module 1 RL. The hand works on the principle of "step forward" in one direction.
Avoid unnecessary passages, do not injure the skin. Each pass must be precise, keep an eye on the angle of the handle as you work. In order to make the tail of the arrow very thin, do not bring the top line to the end of the bottom line.
Dense shading is obtained by observing the following rules:
• maintain handle tilt range of 45° – 60°
• we adhere to the average speed mode of the handle
• work without strong pressure on the handle
• maintain good skin tension with firm fixation
• use the 3RL multi-channel module
Be sure to paint over the space between the eyelashes. We work out the inner corner of the eye with a single-channel needle, the angle of the handle is approximately 60 °. When painting over the area of the inner corner of the eye, the movements should be in only one direction.
Stage 4 . Completion of the procedure.
If there is a need to give clarity, we paint over the outline of the picture using a single-channel needle.
The classic arrow is a universal version of tattooing, which is overwhelmingly popular among women of all ages. After all, such an arrow is suitable for any image, both for everyday and evening. If the classic arrow is performed on aging skin, then the master must take this factor into account, choosing the correct form, which will remain if the upper eyelid sags due to age.
Read also:
Arrow shapes in permanent eyelid makeup
Read also
- Skin properties and color types, or why color is so important in a permanent
- Arrow in permanent makeup: an unfading classic
- The cost of the service, or How to determine the price of permanent makeup
- Permanent make-up of arrows: an individual approach
- Complex permanent make-up: master's difficulties and client's fears
- Tattoo eyelids "perfectly": there are no standards in the procedure!
- Permanent makeup